Showing posts with label how to. Show all posts

Saturday, April 16, 2011

Curious About Homemade Alcohol Inks

Amanda Marks wrote a great blog post about making Homemade Alcohol Inks this morning:
http://www.ajsartsanddesigns.com/2011/04/homemade-alcohol-inks.html

The post includes tips and a recipe to save a ton of money.  Did you know if you make your own alcohol you are only paying $0.04 a tsp opposed to $1.11 a tsp spoon?  Savings anyone can appreciate!

Wednesday, March 23, 2011

Today during Come2Chat Time!

Today during our chat time, I shared a few of the background techniques that I love to use and referenced some of my favourite technique books.  The books I showed, which are pretty much my “bibles” as far as mixed media work goes, are:
Collage Discovery Workshop by Claudine Hellmuth
Collage Discovery Workshop: Beyond the Unexpected by Claudine Hellmuth
Artist Trading Card Workshop by Bernie Berlin
Collage Unleashed by Traci Bautista
Taking Flight by Kelly Rae Roberts
cracklesmallpic
One of the techniques I showed today was a crackle method using Elmer’s glue.  The picture above is of the smaller crackle while the one below is of the larger crackle.
cracklebigpic
Both of these crackle methods are from Claudine Hellmuth’s Collage Discovery Workshop: Beyond the Unexpected.
vaselinepic
This is a peeled paint technique using Vaseline.  This one comes from Claudine’s Collage Discovery Workshop. (can you tell I’m a HUGE Claudine fan?  I get to go take some workshops from her IN PERSON in May!!!)

Saturday, March 19, 2011

Toilet Paper Roll Crafts

Our first craft challenge was to make something Spring themed out of toilet paper rolls and the ideas that everyone came up with were GREAT!  I meant to share these links to other tp tube projects with that post but forgot, so here are a bunch of projects I’ve found from around the internet.  You know, when I used to think of making crafts from toilet paper rolls, it was always children’s crafts but check out these links and you’ll see that the humble tp tube has now become quite sophisticated and can be used for not only adorable kids’ crafts but really lovely adult ones as well!

An adorable Spring egg nest (perfect for Easter eggs) and napkin ring
http://highoncraftblog.blogspot.com/2010/02/toilet-paper-roll-craft-egg-nest-and.html
Sweet pincushion
http://michelemademe.blogspot.com/2010/07/tutorial-toilet-paper-tube-pincushion.html
A darling family of bunnies
http://www.craftsbyamanda.com/2011/03/cardboard-tube-bunny-rabbit-family.html
Pretty cuff bracelets
http://www.flipflopsandapplesauce.com/2008/08/cuff-bracelets-from-toilet-paper-rolls.html
Easter bunny
http://childmadetutorials.blogspot.com/2011/02/paper-roll-easter-bunny.html
Puppy – seriously, you have to see this blog…she makes such cute stuff and the things she can do with tp tubes!!!!!!!
http://childmadetutorials.blogspot.com/2011/02/paper-roll-puppy.html
Shamrocks
http://childmadetutorials.blogspot.com/2011/02/paper-roll-shamrocks.html
This tree is quite amazing!  I think I’m going to make one to hang in my living room!
http://childmadetutorials.blogspot.com/2011/03/paper-roll-twisted-oak-tree.html
I <3 this wall decor!  Geometric and modern!
http://delicateconstruction.blogspot.com/2011/02/paper-towel-roll-wall-decor.html
Cute little bird feeders that kids would love to make.
http://www.creativejewishmom.com/2011/01/toilet-paper-tube-craft-bird-feeders.html
This is a Christmas village but you could easily make it for Easter or anytime!
http://dollarstorecrafts.com/2010/12/make-a-recycled-cardboard-tube-christmas-village/
These flowers are beautiful. 
http://designbynight.blogspot.com/2010/08/paper-towel-roll-flowerstuturial.html
If you hung this in your home, I bet no one would have any clue that it was made from toilet paper tubes.  It is gorgeous!
http://allthingspaper-annmartin.blogspot.com/2011/02/faux-metal-wall-art.html
A variety of cute animals – they used them for Valentine’s Day but they could be used anytime.  How about a whole zoo of tp tube animals?
http://blog.craftzine.com/archive/2011/02/toilet_paper_tube_valentine_an.html
A really novel idea – pixel art made from cardboard tubes
http://yayeveryday.com/post/7692
Finally, you have to see what these artists are doing with paper tubes.  Intricate dioramas, amazing faces, and more – you just can’t imagine how stunning these are!
http://www.brainpickings.org/index.php/2009/10/26/toilet-paper-roll-art/

Friday, October 8, 2010

Paper or Pop Can Ornaments

orn1pic
I demo’d how to make these ornaments on In the Season today.  Here’s the playback link if you missed it:  http://www.linqto.com/PlaybackRoom.aspx?roomname=creativeedventures&name=SingleExplicit_2010_10_08_10_00_15_176
orn2pic
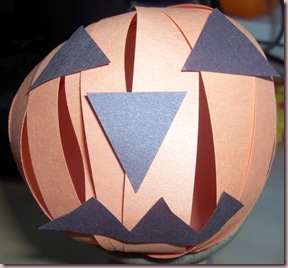
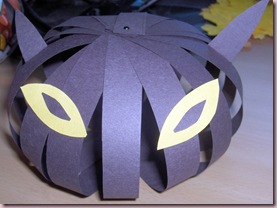
The Jack O’Lantern and the black cat (he still needs whiskers!) were made from construction paper.  You can use any kind of paper that will hold its shape (so tissue paper is too thin) and will give that nice curve without creasing (so you can’t use a thick cardboard).  Begin by cutting strips of paper.  I was using strips that were about 6-7 inches long and about 1/2 to 3/4 inches wide.  On the cat, I cut them all very evenly but I also like the kind of “organic” look it gives on the Jack O’Lantern when I cut those strips at varying widths.  You don’t want them much wider than these (unless you’re making really large ornaments) – I would say 1 inch maximum for ornaments that are about the size you would put on a Christmas tree.  The Jack O’Lantern is about 3 1/2 inches tall while the cat is about 4 inches tall.  For the cat, I used about 14 strips. 
orn4pic
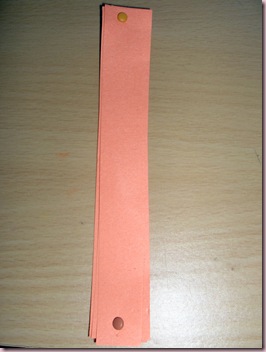
Once you have cut your strips, you need to punch a hole in each end of the strips.  I stacked several strips together and punched through them at the same time.  I couldn’t find my hole punch that makes tiny holes (I’m using mini brads so the holes can’t be very big) so instead I used a nail.  My tip for using a nail or needle is to poke a hole into a cork, squeeze in some Aleene’s Tacky Glue and then push the non-pointy end of the nail/needle into the cork.  This gives you a more comfortable “handle” to hold onto when poking holes with the nail or needle.  Once you have holes punched in both ends of each strip, stack them up so that you can place a brad into each end, holding the stack of strips together.    Now just begin fanning the strips out to form the globe shape of the ornament.  You may have to play with the strips a bit to get them nicely spaced.  You can now add a string for hanging your ornament and any embellishments (like facial features, leaves, stems etc.) to them.  For the ears of the cat, I found it worked best to have them a little longer than I needed so I could fold down a bit of a tab and then glue that to the inside of the strips.
orn3pic
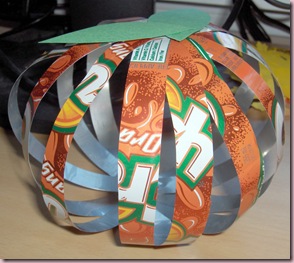
For the one made out of pop cans, I used Orange Crush cans to give me that orange colour of a pumpkin.  I would have liked to have used one more can to make this fuller but only had two cans on hand.  I cut the top and bottom off the cans using a craft knife.  I tried just making a slit with the knife and then continuing to cut around the can with a pair of scissors but that made for a very jagged edge.  Once the top and bottom were cut off, I used scissors to cut the can open so it would lay flat and then to cut the strips.  What’s nice about the can is that they already have a good curve in them.  Also, I used green construction paper here because it was what I had on hand but for the next one I’ll be using leaves cut from a green pop can and adding little tendrils of wire that I’ve spiralled from the top.  Done all in metal, this would make for a great outdoor decoration!  Also, you should be able to slip a tealight or battery operated tealight into these to turn them into lanterns.  When working with the pop cans please remember that they are metal and can get sharp. It’s a wise idea to wear gloves while cutting them and use some sandpaper or nail files to smooth down the burrs and sharp edges.
You can certainly make these for other occasions besides just the Autumn season and Hallowe’en.  Use red and green construction paper to make traditionally coloured Christmas ornaments.  Or how about blue and white for Hanukkah?  You could also buy some pretty scrapbooking paper with holiday designs on it and use that with this technique.  In the chatroom today while I was demo’ing these, Maria Nerius had the great idea of being able to send these ornaments in the mail.  Cut out the strips and put them together with the brads but leave them flat and they’ll fit nicely into an envelope.  You can include some paper pieces or other items for embellishment and the recipient can have the fun of completing the ornaments!  How adorable would that be?  So much fun for kids and adults alike!  I’m always looking for a little something extra to include in my holiday cards without it drastically increasing the cost of postage!
Hope you’ll join us for the next In the Season presented by Creative EdVentures.  It’s every Friday from 11 am to noon Eastern.  http://linqto.com/rooms/creativeedventures

LinkWithin

Related Posts Plugin for WordPress, Blogger...